After the sanding, I was sitting at my desk, the Cux situated on the adjoining table to my left. I was waiting for my game to load.....I threw a glance at it to survey the mess the hull was in. it was in horrible shape.....I couldn't understand what happened. I wet the wood.....I used the white glue......I used the brads instead of those stupid pins.......what??? I looked back at the computer screen.......as I clicked to get to my character, my thoughts was on the solution......there was only one thing to do.....fix it.
The next day started with my making some more "thinned" putty. I was almost out of the natural filler, but I had a full tube of the "golden oak" filler. I had the tubes for so long, the filler had thickened. it took some time, but I managed to transfer half of the golden oak filler into the other tube. then I mixed them both with water and kneaded the tubes very well. I made them a little thinner than last time......I only wanted to apply a thin "skin" on the hull.....the entire surface.
the filler was so thin, you could still see the planks through it. I let that dry and then looked it over. the putty had shrunk in spots and some of the cracks were still visible. I added a finish coat on top of the first one.
once this was thoroughly dry, the second sanding went under way. this time, I only used the fine sandpaper......didn't think i needed the heavy stuff and I wouldn't have to smooth out any sanding marks from it. I made sure to use a little extra at the bow.....the lines were very stubborn and showed back up after the first application had dried.


after this was finished, the hull got a good vacuuming {with the brush attachment} and I wiped it down with a damp cloth, to remove any residual dust. it was very smooth to the touch. I ran my hand over the entire length of the hull, feeling very satisfied with the results. I could see no imperfections with the naked eye, but I knew that looks are deceiving. there is but one way to see if i got them all......a light coat of primer. I was working on a small air compressor, a Cambell / Hausfeld portable, model number FL-1000. it's got a three gallon reserve tank which will hold 100 max psi......just right for an airbrush. that is my plan for this little unit....a friend gave it to me some time ago....I only use it to set tire pressures. I have a larger one....I can paint a car with it, but I feel that it might be too much power......like using a shotgun to do the work of a pellet gun. down in the cellar to set up........


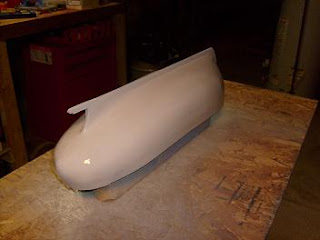
The primer was still wet when i took these pictures.....and yes, there are a few bad spots still, but a great improvement, none the less! even the bow looks good....a couple lines, but I figured that I would do the rub rails and repair them at the same time. I also noted a few areas where some more sanding is required. the "bullet" style of the stern looks very good, and when I slope the stern bulwark to the side bulwarks, it will look even more prominent. there will be a rub rail running down the slope of the stern as well, joining the two side rails together. today, I feel much better......now, to get the paint and get that airbrush going. I hope to be doing this paint job with something that I can regulate, rather than these uncontrollable spray cans!


